
How to Convert MP4 to MP3 with VLC, Audacity or FFmpeg
 ReelBoop
Convert an MP4 to MP3 for free on your computer. Follow the VLC or Audacity steps, or use tested FFmpeg commands to pick the right audio track.

To convert MP4 to MP3, open the video in VLC, pick the Audio - MP3 conversion profile, and save a file ending in .mp3. Use Audacity if you want to trim the recording before export, or use FFmpeg if the MP4 contains several audio tracks and you need to pick one. All three methods can process a local file on your computer.
An MP4 can contain video, audio, and other streams. The conversion takes audio from the MP4 and encodes it as a standalone MP3. Renaming the file leaves its format unchanged. FFmpeg’s guide to streams and transcoding
| What you need | Use | What you choose |
|---|---|---|
| Save audio from one clip with a single soundtrack | VLC | MP3 profile and destination |
| Cut silence or export one passage from an interview | Audacity | The section to keep and the export format |
| Select the right language, commentary, or mic track | FFmpeg | Audio stream and encoding settings |
| Keep an existing AAC soundtrack without re-encoding | FFmpeg | Stream copy to M4A |
Convert MP4 to MP3 in VLC
- In VLC on Windows or Linux, choose Media → Convert / Save. On Mac, open File → Convert / Stream.
- On Windows or Linux, click Add, select your MP4, then click Convert / Save. On Mac, use Open media to select the file.
- Choose Audio - MP3 as the profile.
- Set the destination to a new file such as
interview.mp3and click Start. On Mac, choose Save as File, click Browse to set the destination, then click Save. - Open the saved MP3 and listen to the beginning and end. For an interview, check that the first and last words are intact.
See the VLC desktop conversion guide and VLC’s Mac conversion controls.
Trim or edit the audio in Audacity
Install the compatible FFmpeg import library using Audacity’s instructions for your operating system. Restart Audacity, start a new project, and select your MP4 using File → Import in Audacity 4. In Audacity 3, use File → Import → Audio. Audacity reads the audio from supported video files and shows it as a waveform. Audacity’s FFmpeg setup · Audacity 4 import manual · Audacity 3 import manual
Listen through the recording and use the waveform to find the part you need. For an interview excerpt, select from just before the speaker starts to just after they finish. Open File → Export Audio. In Audacity 3, choose Export to computer if prompted. Set the format to MP3. To save only the highlighted passage, choose Export selected audio in Audacity 4 or Current Selection in Audacity 3. Choose a filename and click Export. Audacity 4 export guide · Audacity 3 export guide
Convert the first audio track with FFmpeg
Use a build that includes the LAME MP3 encoder (libmp3lame). Open a terminal in the folder with your MP4 and substitute your filenames, keeping the quotes around paths with spaces. FFmpeg download and package links · FFmpeg’s LAME encoder documentation
ffmpeg -i "input.mp4" -map 0:a:0 -vn -c:a libmp3lame -q:a 2 "output.mp3"
0:a:0 selects the first audio stream from the first input file. -vn disables video output, and -q:a 2 sets a quality target for LAME’s variable-bitrate encoding. The bitrate varies with the audio. FFmpeg’s stream selection documentation
Find the right audio track
List the audio streams before converting a multilingual file, a recording with separate microphones, or a video with a commentary track.
ffprobe -v error -select_streams a -show_entries stream=index,codec_name,channels:stream_tags=language -of csv=p=0 "input.mp4"
Read the rows in order. For example, 1,aac,1,eng and 2,aac,1,spa describe two mono AAC streams tagged English and Spanish. The first number is the stream’s index across the whole file, including video. Count only audio rows from zero when using 0:a:N. The second audio row becomes 0:a:1.
ffmpeg -i "input.mp4" -map 0:a:1 -vn -c:a libmp3lame -q:a 2 "second-track.mp3"
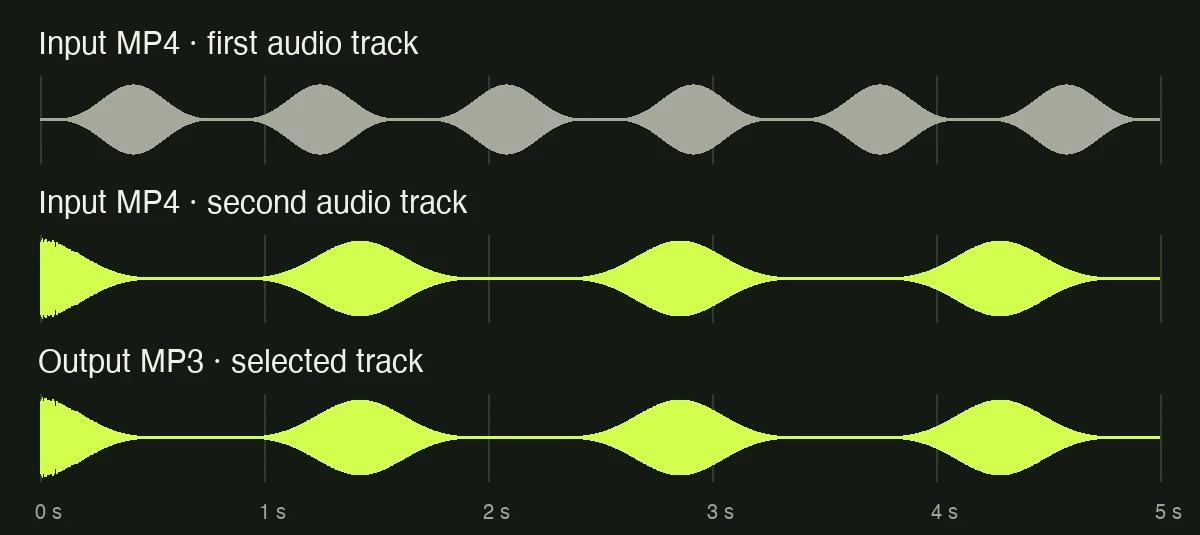
Waveforms from the test files. The MP3 contains the second audio track
selected with 0:a:1.
Language tags may be missing or set to und for undetermined. Play the exports to identify the track if the tags are unclear. If FFprobe exits successfully and prints no rows, the MP4 has no audio stream to convert. FFprobe’s stream filtering documentation
Choose a bitrate or keep the source audio
Use a fixed bitrate when the destination gives you a requirement or you need a predictable file size. For a 128 kbps requirement, replace -q:a 2 with -b:a 128k. FFmpeg’s bitrate and quality options
ffmpeg -i "input.mp4" -map 0:a:0 -vn -c:a libmp3lame -b:a 128k "fixed-bitrate.mp3"
| Constant bitrate | Approximate size per minute | Approximate size for 30 minutes |
|---|---|---|
| 128 kbps | 0.96 MB | 28.8 MB |
| 192 kbps | 1.44 MB | 43.2 MB |
| 256 kbps | 1.92 MB | 57.6 MB |
The estimates use decimal megabytes and exclude tags and file overhead. MP3 encoding is lossy. A higher export bitrate gives the encoder more room, and any detail already lost in the source stays lost. Listen to a short section before choosing a setting for a long file. Audacity’s explanation of MP3 export quality
If FFprobe identifies AAC and your player or editor accepts M4A, you can keep the existing audio by copying the stream. The output is an M4A with the original AAC audio.
ffmpeg -i "input.mp4" -map 0:a:0 -vn -c:a copy "original-audio.m4a"
The stream copy moves the selected audio into a new file without decoding and re-encoding it. FFmpeg’s stream copy documentation
Check the result
Open the saved audio and confirm the duration, language or speaker, and the sound at both ends. If a particular player or upload form asked for MP3, try the file there before sending it.
In a five-second test with FFmpeg 8.1.2, selecting each track produced an MP3 with the expected tone. The fixed-rate file measured 128 kbps, the copied AAC packets matched the source, and FFprobe listed no audio in a video-only test file.
If you also need a still image from the same recording, follow the guide to extracting a frame from video.